
Overview
x360Recover provides an agent orchestration feature to manage key agent settings remotely from the appliance or vault UI.
1. To configure an agent using the agent orchestration feature, login to the appliance or vault, navigate to the Protected System Details page, and click the Agent button.
2. You'll then select from the available agent settings you wish to customize. These setting choices can include basic general settings (like backup volumes, compression, and FastDelta), advanced options (such as the number of connections, the ignored mount points, clustered shared volumes, as well as local cache configuration options for Direct-to-Cloud endpoints.) Agent orchestration is also capable of remotely uninstalling the agent from the protected system.
3. In addition to managing these key static agent configuration parameters, x360Recover also provides the ability to dynamically manage bandwidth throttling during business and non-business hours (as part of a backup policy,) and collect analytics using the Analysis Tool to help troubleshoot common agent issues.
Note: Applying changes to the agent configuration while a backup is in progress may cause the running backup to fail. (For example, if you change the specified backup volumes.)
Please review the following information carefully before applying changes to the agent configuration.
1. Log in to the appliance (or vault for Direct-to-Cloud) and open Agent settings
Several core agent configuration settings can be managed from the appliance (or from the vault for Direct-to-Cloud endpoints.)
STEP 1a. Login to the appliance or vault
STEP 1b. Navigate to the Protected System Details page.
STEP 1c. Click the Agent button to open the agent settings control dialog.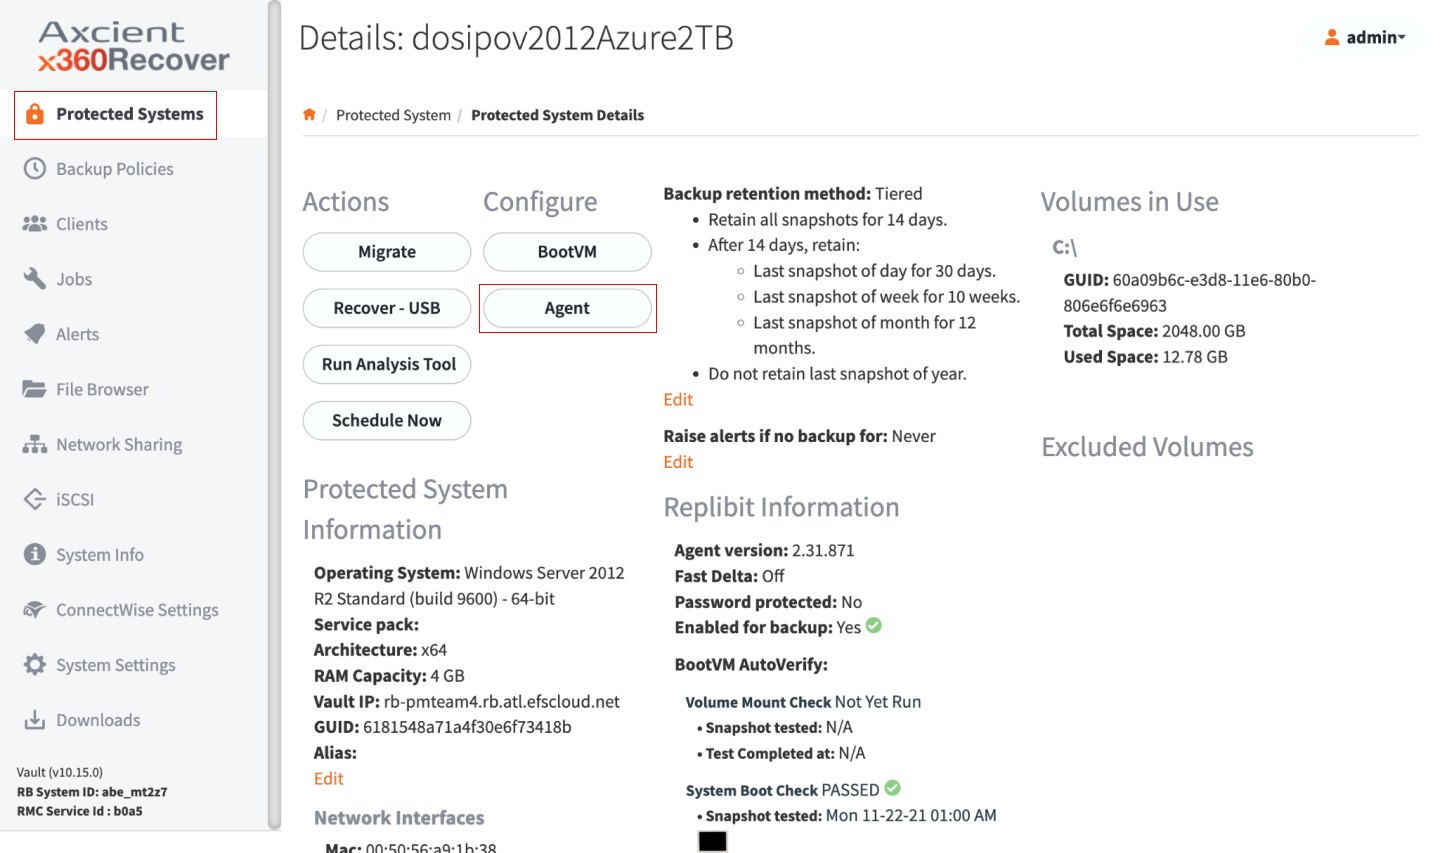
Note: If you don’t see the Agent button under the Configure column, make sure your protected system is running agent version 2.30 or newer.
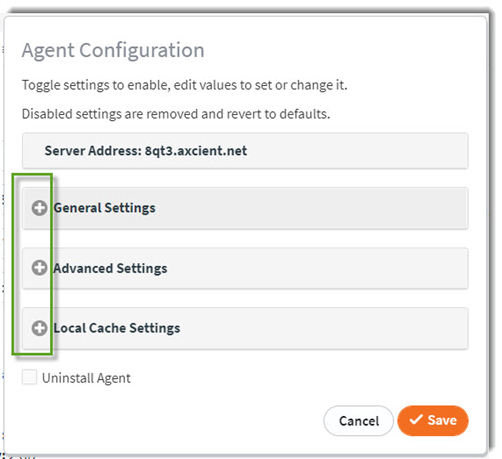
2. Select the agent settings to configure
Several types of agent settings may be controlled using Agent configuration:
- General Settings
- Advanced Settings
- Local Cache Settings
Note: Available options may vary depending on the agent version installed and the protected system's Operating System. Linux agents and macOS agents have different options than Windows agents.
Windows and Linux choices:
macOS choices:
The toggles on the left determine which settings will be sent to the agent.
Existing settings will be enabled and their values pre-populated in the control.
Important: Disabled settings will be removed from the agent configuration file. Disabling a toggle removes the setting from the agent config file and reverts that setting to its internal default value.
How to configure General agent settings
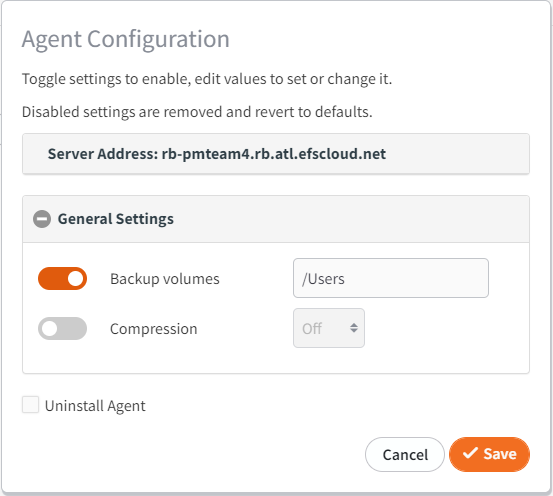
Within the General Settings section, you can control backup volumes, compression, and FastDelta settings:
Note: FastDelta applies only to Windows and Linux systems.
 Note: If you configured an access password when you installed the agent on the endpoint, you will see a Password field at the bottom of the Agent Configuration page. You must enter that password to save any changes made to settings on the Agent Configuration page.
(If you did not choose to configure an access password during the agent installation on the endpoint, you will not see the password field, and no password is required to save agent configuration changes.)
The following tools are available in the General Settings section:
How to configure backup volume settings
Recommended setting: Specify the desired volume(s) to include in this backup
- This field specifies which volumes to include in the backup.
- For Windows systems you can enter comma-separated specific drive letters to be backed up (i.e. C,E,F) and/or volume mount points for volumes mounted without a drive letter. (i.e. C:\Mount)
- For Linux systems you can enter one or more comma-separated volume mount points (i.e. /, /home etc.)
- For macOS systems you can enter one or more folder paths. All folders and files under the specified path(s) will be included in the backup.
Note: Nested folder paths (i.e. /Users, /Users/MyUser) are forbidden to prevent duplication of backup data - If you opt to leave this field to blank, Windows and Linux systems default to backup all supported volumes. On macOS the default path will be set to /Users to include all user data in the backup.
Note: When Backup Volumes is set to blank on Windows and Linux, the agent backs up all supported volumes, including potentially unwanted volumes such as external USB drives. We recommend that you specify desired volumes, so the agent captures only those specified volumes. This reduces the risk (for example) of a USB drive being unintentionally added to the backup. (The blank (‘all’) setting automatically excludes unsupported volumes, Windows container base images, locally attached volumes configured for local cache storage, iSCSI mounted recovery volumes from the appliance, and virtual drives created by Recovery Center.)
Excluding volumes
The default behavior of the agent is to either (a) backup ALL volumes, or (b) ONLY backup the explicitly selected volumes specified in the Backup Volumes setting.
To change the agent selection behavior to always backup ALL volumes EXCEPT these specified volumes, see Ignored Mount Points in the advanced section below.
How to configure compression settings
Recommended setting: Disabled on local LAN appliance connection
You can choose to pre-compress data sent to the server over the network. Compression is a relatively CPU-intensive operation and is only intended to accelerate backup operations in limited network bandwidth conditions (like Direct-to-Cloud backups.)
Enabling compression on local LAN appliance connections is not recommended and will cause backup times to run much longer than normal.
- When agent compression is not specified (when that toggle is disabled), the compression defaults to enabled at Level 3 when operating in Direct-to-Cloud mode.
- When agent compression is not specified (when that toggle is disabled), compression defaults to disabled by default when operating in appliance mode.
- Agent data compression is optimized by default for typical WAN connectivity and Direct-to-Cloud backups.
When to use compression
Enabling agent data compression can significantly affect the amount of time necessary to complete a backup - but this is not as straight forward as you might think.
- Compression of data requires time and CPU overhead, for both the protected system sending and the vault or appliance receiving. If the compression overhead outweighs transmission time over a high-speed connection (like a LAN or very fast Internet connection), then backups may take longer with compression enabled.
Typical compression ratio with average Windows data is about 1.5:1, which means that 3GB of data compresses down to about 2GB to be sent over the network.
In general:
Network speeds below 20Mbps will benefit (have faster backups) with compression enabled.
Network speeds over 100Mbps will suffer (take longer to complete backups.)
Network speeds in between 20Mbps and 100Mbps may either benefit or suffer, depending on the compressibility of the data and the data compression level chosen.
To manually compress, enable the Compression setting toggle and select a compression level.
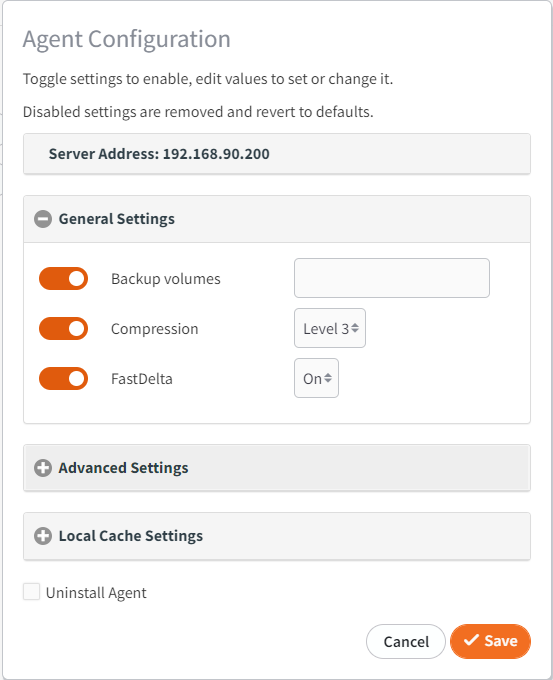
How to configure FastDelta settings
Recommended setting: enabled for all Windows systems containing large files like virtual machine disk images, SQL databases or Exchange servers, as well as all Linux systems.
FastDelta is a proprietary block change detection algorithm that dramatically improves the backup performance of large database applications like Microsoft Exchange and Microsoft SQL on Windows systems. FastDelta is an optimized method for determining block changes to be sent during the backup.
Note: Microsoft’s implementation of SQL Server and Exchange are optimized for disk performance by silently bypassing some elements of Volume ShadowCopy block change tracking, making VSS useless for efficiently tracking changes to the database files while the services are running. This forces the agent to perform a full scan of the entire database file with each incremental backup.
Enabling FastDelta reduces backup times from hours to minutes for larger Exchange and SQL deployments, because the agent no longer has to scan entire database files to find blocks that have changed since the last backup. When using FastDelta, the agent is able to quickly determine the blocks which have changed within the database since the last backup.
On Windows, FastDelta works best when dealing with large files like SQL and Exchange databases. It is less efficient when handling many thousands of small files.
We recommend enabling FastDelta for Windows servers running Microsoft SQL Server or Microsoft Exchange, and leaving it disabled for other types of Windows systems.
On Windows systems, FastDelta is turned OFF by default.
On Linux systems, FastDelta is part of the proprietary Linux kernel driver providing snapshot and changed block tracking support in the Linux environment. FastDelta is enabled by default for Linux systems. Disabling FastDelta on Linux systems forces the agent to use a legacy file-scan mechanism for determining block changes and is not recommended.
How to configure Advanced agent settings
Within the Advanced settings section of the Agent Configuration tool, you can set up the number of connections, the number of workers and the ignored mount points:
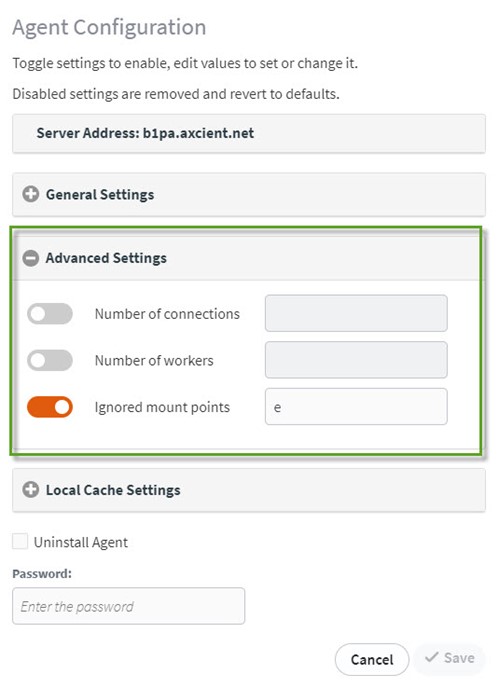
Number of connections controls how many parallel transmission threads are used when uploading data to the server. This setting is dynamically scaled by default based on the number of CPU cores and generally does not need to be modified. If you are running the agent in Microsoft Azure and experiencing backup disconnections, it may be necessary to reduce the number of connections to keep from over-saturating the NAT gateway. Recommended setting for protected systems running in the Azure cloud is 4. |
|
Ignored mount points excludes specific volumes that are mounted within another volume. Ordinarily, if you include a drive letter (C: for example), any volume mounted within that volume would automatically be included in the backup. However, if you should need to exclude certain mount points (Terminal Server Profile Disks, for example), you can specify the path to each mount point here, separated by semi-colons. (i.e. C:\Users) The ignored mount points option may also be used to alter the backup selection mechanism. The normal operation is to either back up all compatible volumes, or only backup a specific set of selected volumes. If you prefer to always back up all volumes EXCEPT specifically selected volumes, you may use Ignored Mount Points for this choice. Set Backup Volumes to blank (backup all volumes) and set Ignored Mount Points to the volume(s) you wish to exclude. |
CSV (Cluster Shared Volumes) support for Microsoft Cluster Shared Volumes is disabled by default. Use this setting to enable CSV. Enabling CSV provides specific support for backing up Cluster Shared Volumes in a Microsoft Failover Cluster. During each backup, whichever host in the Failover Cluster is the master for a Cluster Shared Volume will perform a backup of the volume. Over time, each host in the cluster will eventually take backups of each volume. Consult the Protected Systems Details page snapshot history for a record of which volumes were backed up by each server over time. For more details about support for Cluster Shared Volumes see this knowledgebase article. |
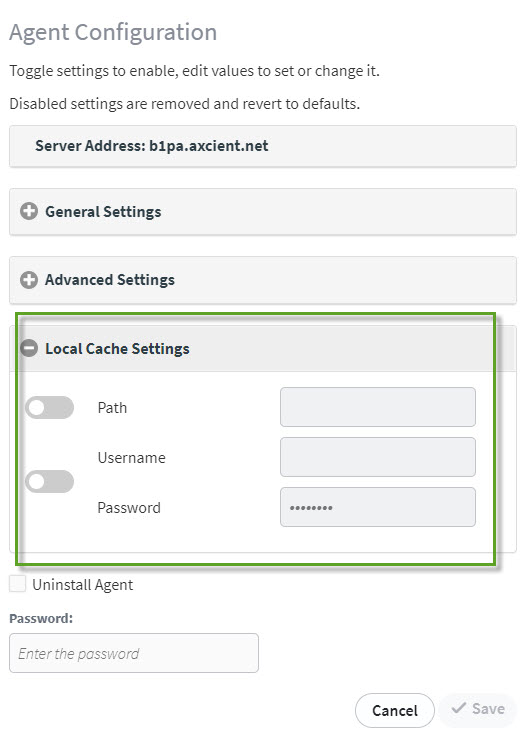
How to configure Local Cache Settings
When enabled, the Local Cache Settings will generate a repository of block data on a local storage device. This helps accelerate recovery of Direct-to-Cloud endpoints.
|
Path: Specifying a path enables the local cache settings and designates the location where the data repository will be maintained.
|
|
Username and Password are only required if you are using a network share path. The toggle controls both username and password, since they are required together.
Note: This password is never displayed or stored on the appliance or vault. This password (a) may be updated on the agent by entering a new value or (b) may be deleted by disabling the username and password fields. IMPORTANT: Remember to save agent settings when configuration is complete. |
Remember to save agent settings when configuration is complete.
Note: If you configured an access password when you installed the agent on the endpoint, you will see a Password field at the bottom of the Agent Configuration page. You must enter that password to save any changes.
(If you did not choose to configure an access password during the agent installation on the endpoint, you will not see the password field, and no password is required to save agent configuration changes.)
How to manage other configuration settings
Agent upload bandwidth and disk I/O throttling can be managed within the Backup Policy. The agent can be managed to automatically limit network upload speed and Disk read throughput to prevent backup operations from impacting user experience on the protected system or overwhelming the Internet connection.
For details on managing throttling settings for the agent, see: Create a Backup Policy Schedule and refer to the section on Throttling.
How to troubleshoot agent issues
If you are experiencing issues with the agent not registering with the appliance or vault, please check the following:
- Network connectivity: The agent must be able to communicate with the appliance or vault. If networking errors or other issues interfere with this communication process, the agent will not successfully register with the vault.
-
Previous installations: The agent cannot be installed over an existing agent instance. If an agent is already installed, it must be uninstalled and then re-installed to change modes.
- If you are converting an existing appliance agent to Direct-to-Cloud mode, first uninstall the agent, then re-install the agent using the Direct-to-Cloud installer. The configuration file will be retained and modified to switch the agent to Direct-to-Cloud mode and attach to the existing dataset on the vault
- If you are converting an existing Direct-to-Cloud agent to appliance mode, some additional steps are needed:
- Uninstall the Direct-to-Cloud agent
- Delete the permid.cfg file from the agent directory (Windows)
- Change the SERVER address in the aristos.cfg file (Windows)
- Change the server address in the config.toml file (Linux and macOS)
- Delete the secure.toml file (Linux and macOS)
- Remove the red_id key and value from the config.toml file (Linux and macOS)
Note: Windows agent Configuration files are located in the agent installation directory, C:\Program Files (x86)\Replibit by default
Linux agent Configuration files are located in /etc/xcloud-agent
macOS agent Configuration files are located /Library/xCloudAgent/Content/etc
Re-install the agent in appliance mode
Firewall considerations: The agent needs to communicate outbound on the internet to the vault on the following ports: 443, 9079, 9082, and 9090.
Issues with Antivirus Utilities: Refer to the following KB articles for details on excluding the x360Recover agent from antivirus scanning
- For general use cases see Exclude an agent from antivirus scans
- For SentinelOne see Use SentinelOne with x360Recover
How to use agent orchestration to manage core settings
Note: Applying changes to the agent configuration while a backup is in progress may cause the running backup to fail. (For example, if you change the specified backup volumes.)
Please review the following information carefully before applying changes to the agent configuration.
Agent orchestration uses the agent’s endpoint manager service to update settings on the protected system. The agent services will be stopped and restarted during the configuration file update process.
When you click Save to update agent settings, an agent job is created and dispatched to the protected system.
You can monitor the progress of the job on the Jobs> Agent page:
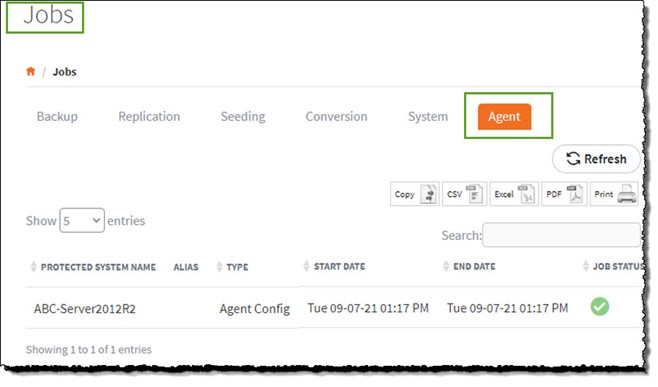
The endpoint manager service on the protected system retrieves the job, applies the specified settings, and restarts the agent service.
The agent then reconnects to the appliance and posts the current settings, updating with any changes just applied.
Note: It can take up to 1 minute for the endpoint manager service to pick up and run the agent configuration job. It may then take up to 2 minutes for the agent service to restart and update the appliance with the new settings.
Remember: Applying changes to the agent configuration while a backup is in progress may cause the running backup to fail. If a backup fails, the next backup should complete successfully with the new settings.
SUPPORT | 720-204-4500 | 800-352-0248
- Contact Axcient Support at https://partner.axcient.com/login or call 800-352-0248
- Have you tried our Support chat for quick questions?
- Free certification courses are available in the Axcient x360Portal under Training
- Subscribe to Axcient Status page for updates and scheduled maintenance
| 711 | 889 | 930 | 1182 | 1470 | 1481 | 1482 | 1758 | 1785