
What is incremental vault recovery?
Vault recovery has always been a feature of x360Recover. (It's the process of recovering snapshot data for a protected system on a vault and moving that data back to an appliance.) Vault recovery can be useful when an appliance has been lost or damaged, or when you are switching a protected system from Direct-to-Cloud mode to appliance mode.
Incremental vault recovery is a new feature (available in v. 12.3.0 and newer) which allows you to perform the recovery of protected system data on a vault and move that data back to an appliance in multiple passes.
With incremental vault recovery, you can now maintain an uninterrupted set of backups, even while you are actively repairing the appliance and recovering the cloud data.
When will you need incremental vault recovery? How does it work?
Consider the scenario where you have lost an appliance at a client location.
Traditionally, there would be a window of time in which the client's protected systems would be without a backup. This would continue until you could replace the failed appliance.
Even worse, if you did not want to abandon the existing backup history on the vault, you would incur additional time without new backups while you perform a vault recovery to the repaired or replaced appliance. (This is necessary to maintain the replication link with the existing vault data.)
Also see: Displacing third party BDR with x360Recover
With incremental vault recovery (in v.12.3.0), you can now maintain an uninterrupted set of backups while repairing the appliance and recovering the cloud data:
- In this scenario, you would immediately reconfigure the protected system to perform Direct-to-Cloud backups. This maintains the stream of backups for your client systems by sending backups to the vault while you deal with the failed appliance.
- Then, once the appliance is repaired, you perform incremental recovery steps, to copy the protected system data back to the appliance.
- The first pass will copy the base image and all recovery points currently existing on the vault to the appliance. Backups will continue to run and new recovery points will continue to be created on the vault during this process.
Note: You can select the ‘Starting Point’ for your appliance data when performing the first pass. Select the recovery point you wish to be the ‘Base’ image (oldest snapshot) available on the appliance. You do not need to replicate ALL historical data on the vault back to the appliance (if space is limited, for example.)
- Once the initial recovery pass is completed, you can perform additional ‘incremental’ passes to collect newly-created snapshots on the vault and copy them to the appliance.
- The first pass will copy the base image and all recovery points currently existing on the vault to the appliance. Backups will continue to run and new recovery points will continue to be created on the vault during this process.
- When the appliance is synced with the vault, perform the ‘Final’ pass. The ‘final’ recovery pass ends the ‘incremental’ recovery process and automatically strips the ‘Direct-to-Cloud’ mode flag from the protected system on the vault. (This will block further Direct-to-Cloud backups.)
To complete the process, you (a) manually reconfigure the agent to point to the appliance and (b) configure replication on the appliance to the vault.
Detailed instructions on how to perform an incremental vault recovery appear later in this article. (See below)
DeleteSteps to perform incremental vault recovery
STEP 1. To begin the recovery process, click Recover from the Protected Systems page of the appliance.
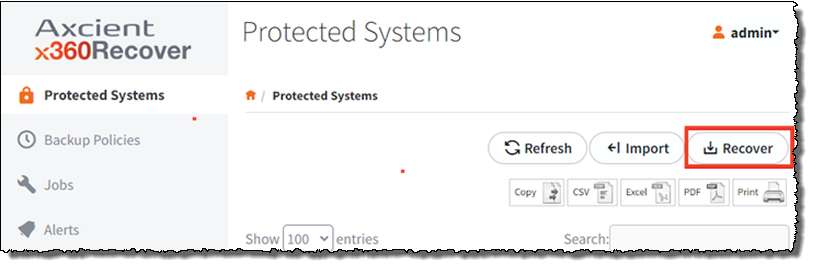
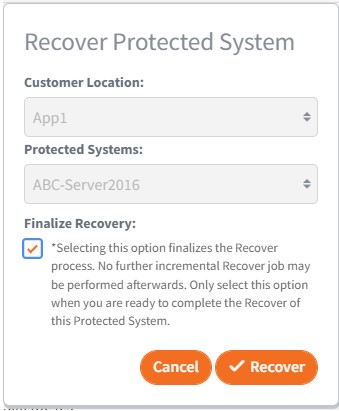
This will open the ‘Recover Protected System’ configuration dialog.
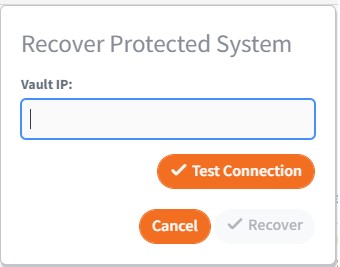
STEP 2. Enter the IP address or FQDN of your vault and click Test Connection.
STEP 3. When the connection test is successful, select the Customer Location and Protected Systems you wish to recover.
Note: Only customer locations and protected systems that belong to the same client as THIS appliance will be visible. If no protected systems belonging to this client exist on the vault (that are not already present on the appliance) then the selection list will be empty.
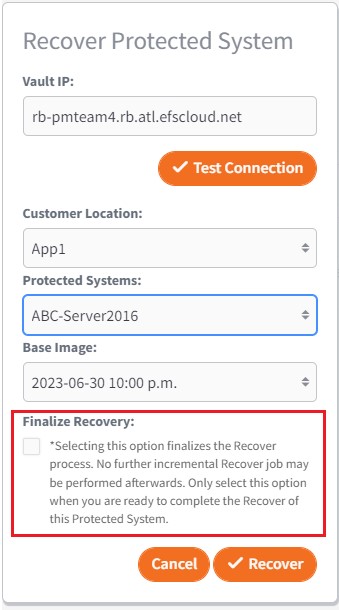
IMPORTANT: By default, the Finalize Recovery check box will be unselected.
- Leaving this check box unchecked means that we will perform an incremental recovery and additional recovery passes will remain possible.
- If you check this box and select Finalize Recovery, this will be the LAST recovery pass (even if it is the FIRST pass) and no further recovery operations will be possible later.
STEP 4. Now that you have selected the customer location and the protected systems, select the desired Base Image.
Note: The base image will be the OLDEST snapshot recovered to the appliance from the vault.
After you have selected the desired base image, click Recover to begin.
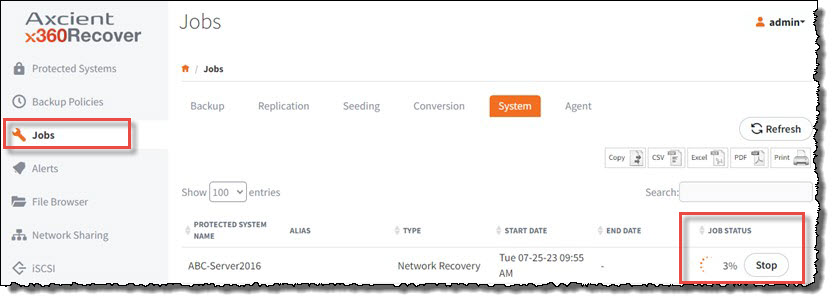
You may monitor progress on the Jobs -> System page for details:
What happens next?
Once the initial recover pass is completed, the protected system will be listed on the Protected Systems page.
Icons in the STATUS column will indicate that backups are currently disabled, and an incremental recovery process is in progress.

STEP 5. To perform additional incremental recovery passes for this protected system, navigate to the Protected System Details page and click Recover.
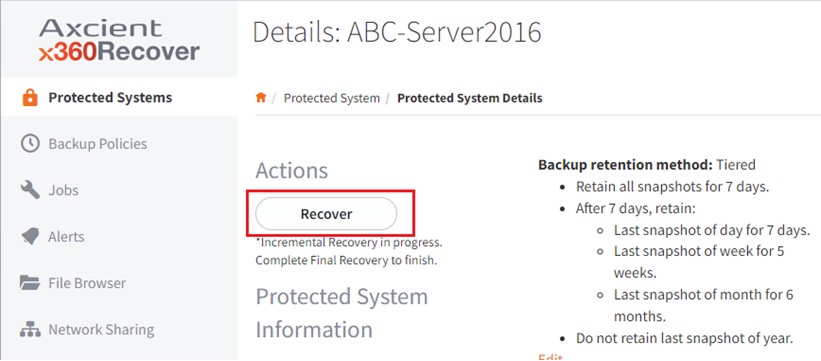
- Note that Recover is the only option available under the Actions section until the final recover pass is completed.
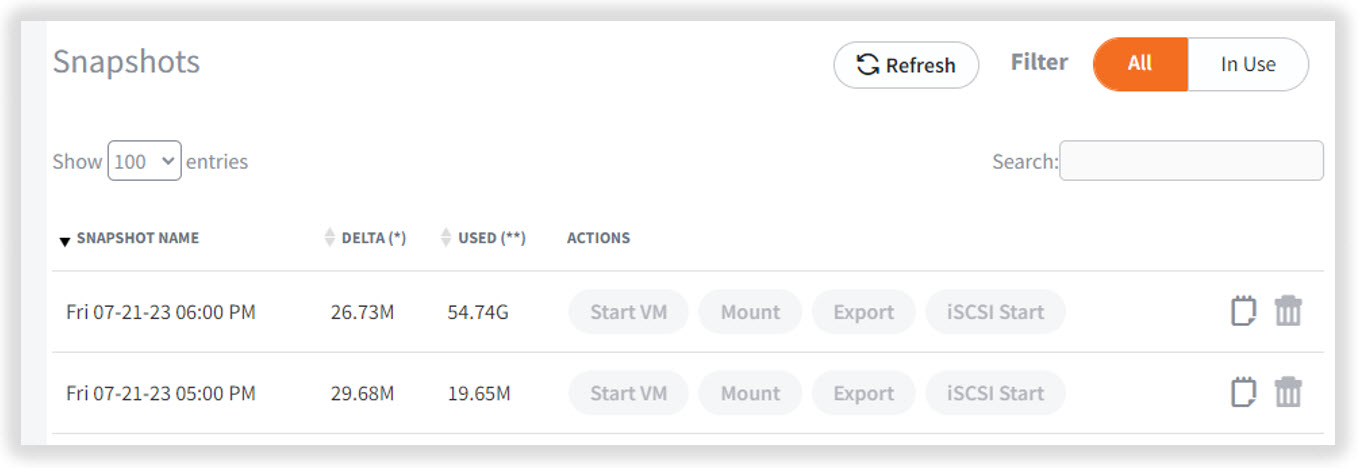
As shown below, all snapshot actions are also grayed out and unavailable until the final recover pass is completed:
- While you are continuing incremental recovery actions, the customer location and protected system selections are locked.
Continue with another Incremental pass, or, if you have completed all desired passes, check the box for Finalize Recovery (to perform the final pass) and click Recover.
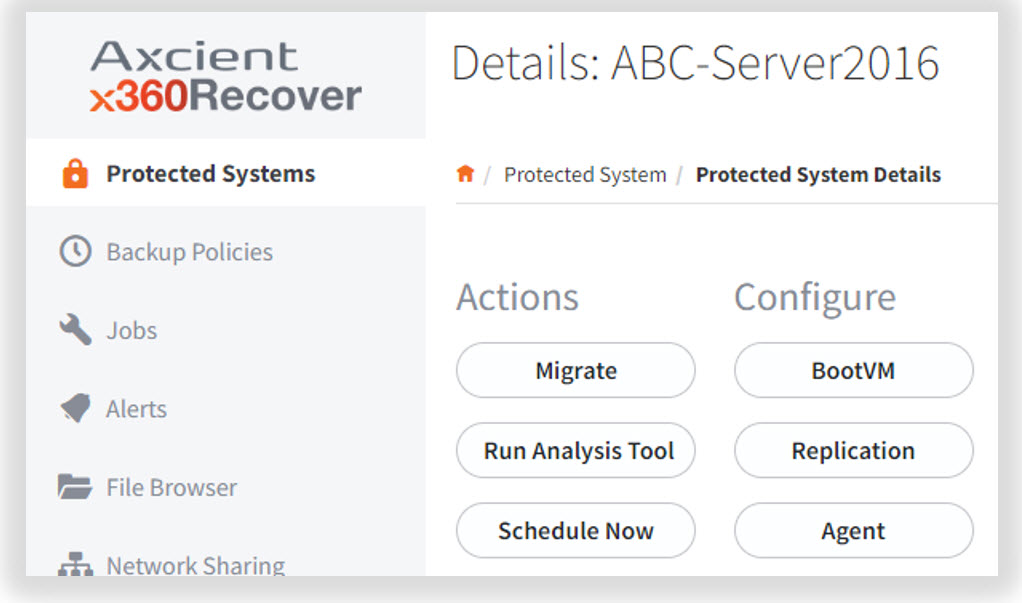
Once the final recovery pass is completed, all actions once more become available for the protected system on the appliance:
STEP 6. Enable replication to the vault by clicking Replication and configuring the desired settings:
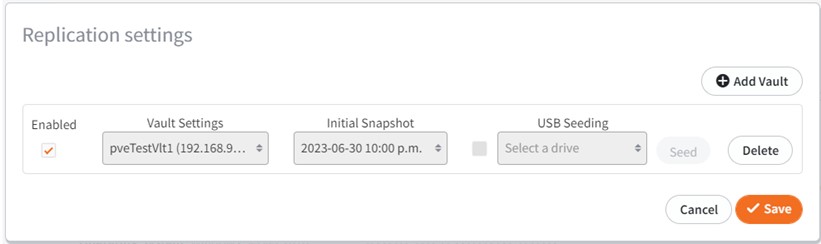
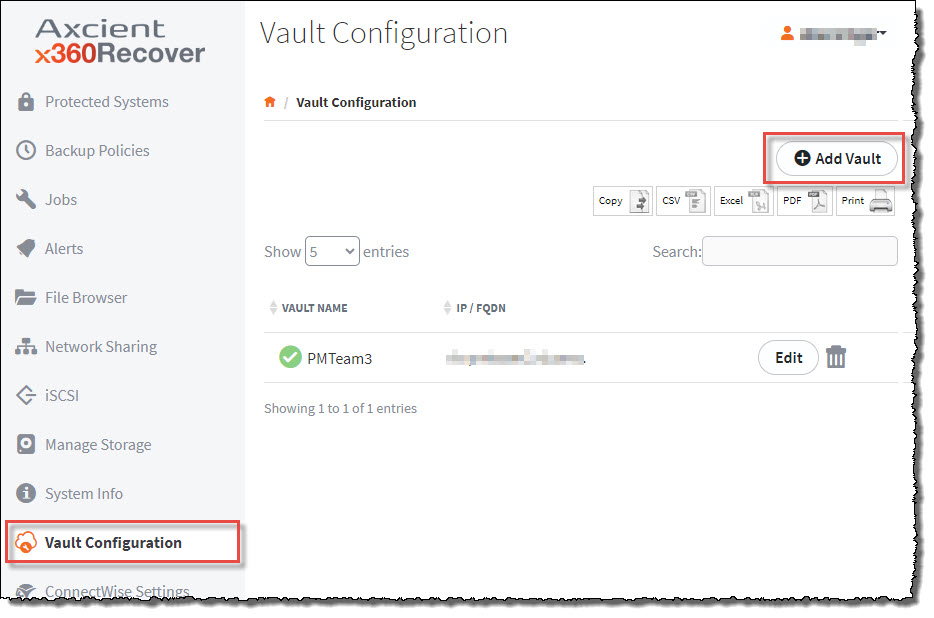
Note: If this is a newly-deployed appliance, you must first configure the vault settings before you enable replication.
Do this by selecting Vault Configuration from the left menu of the appliance and configuring the settings for the vault (before you configure the replication for the protected system.) For detailed instructions, see How to add vaults and manage settings.
STEP 7. You must now reconfigure the agent for appliance mode.
7.1. On the protected system, locate the aristos.cfg file in the agent installation directory. Typically, this file is found at
c:\program files (x86)\replibit
7.2. Stop the following services:
- Replibit agent service
- Replibit agent update service
- Replibit management service
7.3. Edit the aristos.cfg file in the agent installation directory by changing the ‘SERVER=<value>’ to SERVER=<IP address of appliance>
7.4. When you have completed that change, save the file.
7.5. If the system was configured in Direct-to-Cloud mode, delete the file Permid.cfg
Deleting this file will convert the agent back to appliance mode.
Additional help:
For help converting an appliance protected system to Direct-to-Cloud mode, review Convert an existing appliance agent to Direct-to-Cloud
For help converting a Direct-to-Cloud protected system to appliance mode, review Convert a Direct-to-Cloud endpoint to appliance mode
Additional help:
For help converting an appliance-based protected system to Direct-to-Cloud mode, review Convert an existing appliance agent to Direct-to-Cloud
For help converting a Direct-to-Cloud protected system to appliance mode, review Convert a Direct-to-Cloud endpoint to appliance mode
SUPPORT | 720-204-4500 | 800-352-0248
- Contact Axcient Support at https://partner.axcient.com/login or call 800-352-0248
- Free certification courses are available in the Axcient x360Portal under Training
- To learn more about Axcient products, sign up for a free one-on-one training
- Subscribe to the Axcient Status page for updates and scheduled maintenance
1564